
|
|
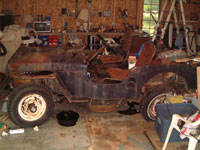
Body Blues
Since Ole Blue arrived last spring, it has been
sitting quietly in the garage while Old Yeller occupied all our time
and attention. Finally, in early fall, we began the disassembly process.
The plan was to remove the body and start the “frame-up”
restoration.
The
fender is connected to…
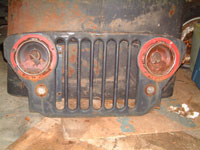
The simple structure of the jeep body components makes the disassembly
process every straight forward; remove the grill, both fenders and the
tub. With the engine already removed, the bolts and brackets holding
the grill and fenders were easy to spot. We spent a Saturday morning
removing those parts. It was great fun getting starting.
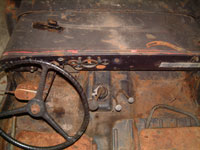
The second session found Evan focusing on the dash and firewall, while
Barry worked on the body mounts. Barry was able to use the impact wrench
on most of the body mount bolts, while Evan spent extra time removing
gauges and accessories to be restored. None of the bolts will be reused
and most broke in the removal process.
One item of concern was removing the steering wheel. We had read some
articles that indicated that getting the steering wheel off can be a
difficult task, requiring a special puller. Luckily, we were able to
use our hub puller and the wheel popped right off.
The second session ended with the body mount bolts on the passenger
side removed and the dash stripped. Evan had also removed the pedals
and the transmission cover.
Lift off!
Session three started with the removal of the final body mount bolts.
When the PO had replaced the front floor pans, they had simple welded
new plate over the old floor. This meant that the bolt heads were sandwiched
between the original floor and the new plate. We ended up cutting the
final (we thought) bolts with a saws-all.
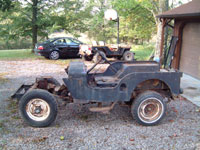
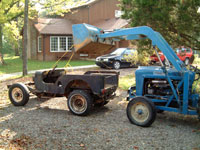
With the body ready to be lifted off, we aired up the tires and replaced
the steering wheel before pushing Ole Blue out into the sunshine. Barry’s
1964 Ford 4000 tractor is equipped with a front-end loader and was the
perfect tool for lifting the body off of the chassis. The tub is relatively
light and we used a nylon rope attached to the tailgate hooks and holes
in the dash. The rope was attached to a hook on the loader bucket.
Evan operated the loader and gently started lifting on the rope. The
body moved upward a couple of inches, and then stopped. Clearly it was
hanging on something. The body was free at the corners and appeared
to simply need to be lifted up and back, to clear the shift levers and
steering column. A second try and the body was still stuck!
After a more careful examination, we found a brace on the driver’s
side step was still bolted to the frame. We had missed it. The offending
bolt was quickly removed and the lift off commenced once again. This
time the body came off without a problem.
The downside…
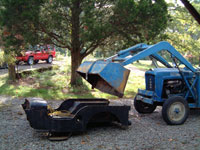
Once Evan lowered the tub to the ground, we decided to flip it on its
side for a better look. What we saw was not pretty. The complete underside
will need to be replaced. All of the channels are rusted and the rear
deck has enough holes to warrant replacement. As noted earlier, the
floor panels had been patched over, but we would want to do a proper
repair.
While working on the dash and firewall, Evan had uncovered (literarily)
a gash in the firewall. It appeared someone had taken a giant can opener
and ripped the sheet metal. This had been hidden behind a patch. Neither
of us could figure out what the PO might have been trying to accomplish.
The bottom line…
It appears we are faced with replacing everything underneath the tub
and repairing the firewall. We will need to make a decision between
the cost and effort of the repairs and a tub replacement. For the moment,
we hauled the body out into the field and covered it for now.
The good news…
While we had been able to see much of the front half of the frame, the
tub removal gave us are first real look at the total chassis. The frame
appears to have surface rust, but no problems. The only repair needed
will be to the top of the battery tray.
After cleaning off the chassis with an air gun and garden hose, we wheeled
it back into the garage. Next up is removal of the drive train components.
Barry’s notes:
Those who know old tractors will see that the Ford is dressed in the
wrong colors. When I purchased the tractor it was bright yellow. I cleaned
it up and used spray cans to paint it Ford blue. The hood should be
grey and I still feel guilty that I didn’t take the time to make
it right. That is one lesson I plan to apply to our jeep restorations;
if you are going to invest the time, get it right and do it right.
Evan’s notes:
Working on a Willys and driving the old Ford tractor:
that's a good day!
|
|


