The past year has flown with work and family taking priority (as always) over finishing Ole Blue. Progress has been made, if not recorded (which as you will see later, may be an issue). When last we left you, we were down to the final few elements to get Ole Blue on the road and decked out in farm jeep gear. Specifically the PTO and the Newgren lift, complete with a crank mount hydraulic pump.
The PTO (power take off) unit is a fundamental part of a farm jeep. The earliest civilian jeeps offered the PTO as an option and the transmission was designed so the PTO gear box was a direct bolt-on. The original body had a cover on the transmission tunnel that was removed to allow the shifter to be positioned without any modifications. When we purchased our replacement tub, we specified that the PTO opening be cut as part of the body preparation.
We have been lucky enough to collect a couple of complete PTO systems (shifter, shaft and rear gear box) over the years, so Barry picked what he thought was the best of the lot to install. Installation is as simple as it gets. First, remove the 5 bolts holding the cover on the back of the transmission. Position
the shifter lever up through the hole in the floor and bolt the shifter in place. It is that simple. But it didn’t work for us.
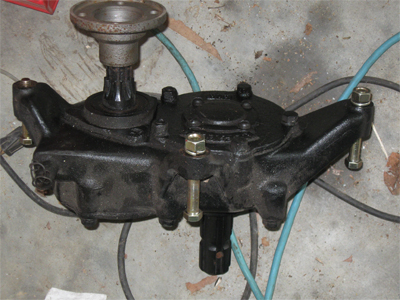
Barry had tested the shifter before installing it. It is a simple sliding mechanism that pushes a gear on the end of the shifter into the outer ring of the output gear in the transmission (see photo). The shifter had operated smoothly on the floor, but would not engage when installed. Part of our plan for this site has been to document our work so a) we can return to it later as needed (more on that later) and b) to share our experiences with the reader. In this case, that documentation process saved us a lot of frustration.
Pictures taken before, during and after we take something apart and reassembly it are an important documentation tool. When something doesn’t go back together (or together for the first time) we use the pictures to find clues to the problem. Barry took a look at the picture of the PTO gear on the back of
the transmission. He saw that one leg of the cotter pin through the castle nut had not been bent up and was blocking the shifter from completely engaging.
Removing the shifter was easy and Barry quickly bent the leg of the pin over the nut. He replaced the shifter and hopped back in the driver’s seat. The shifter easily moved in and out of position. Barry started the engine, put the transfer case in neutral, engage the PTO and put the transmission in 1st gear.
Looking under the jeep, he could see the PTO spinning along. It works!
Rear geared
The PTO gear box mounts directly to the bumper. The bumper and frame are pre-drilled and an opening for the shaft was also standard on all jeeps. In our case, the Newgren mounts to the bumper and frame first, then the gear box is bolted on. Other than the gear box being very heavy, the process is straight
forward. The final step is to attach the flange for the drive shaft to the splined input shaft on the gear box. The Newgren instructions call for an additional spacer on the input shaft, to offset the slight rearward position of the gearbox caused by the lift frame.
Shafted
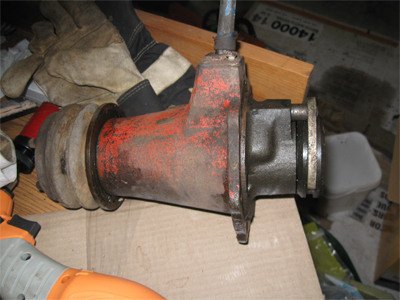
The PTO shaft is one of the more difficult items to locate. There were different lengths produced for the early CJ series, trucks and for the early CJ5s. Ole Yeller came with a complete, working PTO, so we had measurements when we went shopping. The shifter, gear box and shaft we are installing came from the same jeep. All appeared to have had little use. The only damage is to one of the rubber boots on the shaft. It has small tears, as can be seen in the photo. Replacement boots are available (we have one), but changing them is a complete adventure.
This page http://48cj2a.com/ptoshaft.htm has excellent directions for the repair. Not having access to a repair kit or even a shop press, we will try doing a patch job. For now, we will give the shaft a coat of paint and try some epoxy on the boot.
Next up – There’s a reason for that.
Barry’s notes: One of the best clues we have to the age of our jeep is the date stamped on the transmission housing – November 1949. I wonder how the person assembling the transmission missed it. Perhaps it was getting close to the end of the day or there were other distractions. Maybe he was
thinking of Thanksgiving. Or maybe he did them all that way.