Hanging from the frame cross member, behind the engine was the old “stay cable.” What, you might ask, is a “stay cable” and why do I need one? From what we have read, the jeep engineers were concerned about sudden stops sending the engine forward on its rubber mounts and putting the fan blade into the radiator (this must have been before they designed the brakes). While there was little concern for driver safety (remember you are sitting on the gas tank) the “stay cable”, along with various guard plates (brake master cylinder, oil pan and transmission/transfer case) were intended to protect the jeep from harm.
The old cable had been removed – forcibly by all appearance – from Ole Blue’s original engine. New cables are available and this was one of the easiest and quickest restoration jobs. The cable, which has a ball on one end and a threaded rod on the other, is inserted through the cross member and bolted to the bell housing. Perhaps it doesn’t warrant a mention in the restoration annals, but how else would you know about this little piece of jeep history?
Stay right there – part 2
Back around Part 10, we had rebuilt the hand brake, emergency brake (e-brake) or parking brake. Those are all terms used for the driveshaft drum and brake shoes located just behind the transfer case. The brake is operated by a lever with an attached cable. The cable is routed into the engine compartment, through the firewall and attaches to a handle sticking out of the dash that is housed inside a ratcheting bracket. Pulling the handle out forces the brake shoes against the drum and prevents the rear driveshaft from turning.
Unlike a regular hydraulic brake system, the e-brake relies on a cable, brackets and springs to make everything work. Missing from our reproduction body, but still part of Ole Blue’s original body were the underbody return spring mount and the firewall “upper cable clip” mount. The old body sits quietly rusting down by the barn. We are very glad we kept the body and didn’t send it to recycling heaven. We are still learning from it and taking the occasional needed part.
Once again, Barry reluctantly donned his helmet and put welder to body. We doubt that many will ever notice the stout, but ugly welding job. A strong spring and wire hook attach to the lever and return the brakes to the “free” position as the brake handle is released.
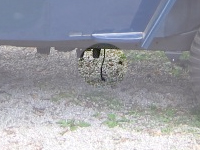
The brake system requires that the cable body remain firmly in place when the handle is pulled. Two reproduction clamps are available for the top (firewall) and bottom (frame cross member). There is a third clip, which holds the cable way from the spinning front drive shaft. No amount of on-line hunting produced the third or middle clip. We know it mounted to the engine and had determined that we would need to fabricate our own simple mount.
See, I knew we would need that
The reader may have noticed that Barry’s garage is, shall we say, cluttered. It is very much like his desk at work and most likely the way his mind is organized too. But sometimes that habit of tossing on the pile instead of tossing out pays off. One day while searching for something else, Barry spotted the old e-brake cable, removed during the original disassembly of Ole Blue. And there, big as life, was a clip in the middle of the cable. Proof, once again, that you really might need that stuff some day.
Getting a handle on the situation
With all the cables, springs and clamps in place, it was time to adjust and test the e-brake. The manual is very specific about adjusting the e-brake, complete with instructions on how touse the brake tool or screwdriver as a lever to move the “star wheel” to snug the brake shoe against the drum. With therear of the jeep jacked off the floor, we were able to “lock” the shoes against the drum. According to the manual, we needed to “back-off” the star wheel exactly 7 clicks.
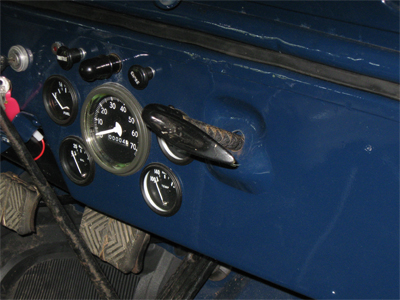
Pulling out the dash handle did, indeed, lock the wheels, but we couldn’t get the handle to stay in the “pulled out” position. Since neither Old Yeller nor Ole Blue ever had a working e-brake, we weren’t sure exactly how it was supposed to work. We assumed we pulled the handle out and turned it to lock in the “on” position. It didn’t want to stay.
Were we missing something in the new body’s “ratcheting bracket” or was it an operator error? Researching the operator’s manual resulted in just the instructions to “set the hand brake.” Looking at Ole Yellow’s bracket, Ole Blue’s original and new body brackets didn’t reveal any obvious differences.
If at first…
Evan left for the day, still scratching his head. Later that evening and after a few beers, Barry sat in the driver’s seat, pulling on the handle and turning it 90 degrees to the right. After a few tries at various lengths, he found a spot that would “lock” and was able to repeatedly release, then lock the handle.
Backing the jeep out garage, Barry headed for a small incline. He tried setting the hand brake, and then removed his foot from the brake pedal. The jeep started rolling. Pulling the hand brake out further stopped the forward motion. We either have an adjustment problem (7 clicks is too many) or a problem with the handle operation. The good news is that the e-brake does work, we just need to fine tune it.
Stay right there – part 3
As stated in the Jeeps in the Family section, all the jeeps that have lived here have done so without a windshield. The jeeps were rarely on the road, didn’t have tops and no windshield meant you had the ability to drive in the woods without worrying about low hanging branches. Then there is the wind in your face.
Ole Blue will be roadworthy and we had the original windshield repaired, painted and had new glass installed. Installing and removing the windshield is very simple. A single bolt on each side of the body allows the windshield to pivot and fold flat against the hood. We’ve even installed a new tie-down strap on the front of the grill that holds the windshield in place when it is folded down.
Except for mounting the new seal backwards (just had to remove and reinstall 12 screws) the installation went without a hitch. We had purchased new latches for the dash and windshield, which lock the windshield in the upright position. Those were a simple bolt-on process, as evidenced by Evan’s ability to watch a golf game while doing the install.
Next up – PTO’d