
Project "Ole Blue"
Part 16 – These Little Things


With Ole Blue back in the garage under its own power, we started to attack all the little things still needing to be done before we can drive on the road or in the field. The list is still long and winter has returned. With no heat in the garage, work has slowed, but there is progress to report.
Lighten up
Ole Blue had the traditional turn signal treatment of the day. There was evidence of turn signal light mounting holes in the fenders and extra taillights in the rear. We have already “gone modern” by using dual filament bulbs in the rear (a single light to serve as tail, brake and turn signal) and decided we would make the parking lights do dual duty too. So the challenge became how to modify the parking lights.
The design of the parking lights on the 3a is extremely simple. The grill is indented and a single filament bulb socket is seated in the small hole. The plastic lens covers the small bulb and the space between the cover and the body is too small to house a dual filament bulb and socket. Modifying the grill seemed like the only solution.
After some searching, we found our friends on the 3a page had a solution that required minimal modification. It uses a standard socket, available at any auto parts store, and enlarging of the socket hole - http://www.cj-3a.com/installing_front_turn_signals.htm. While this looked promising, Barry had another plan.
Bright idea
Over on the tractor forum Barry frequents, there are ongoing discussions of using LEDs for tractor lighting needs. LED assemblies are available that simply replace traditional bulbs, but individual LEDs are available so you can build your own. Inspired by the guy who made his headlights out of individual LEDs and the bottom of a Coke can, Barry ordered four white and six yellow 12 volt individual LED bulbs from superbrightleds.com. These are small, wired (3 feet of wire!) and cost $2-$3 each.
Using the old lens cover as a guide, Barry made an LED holder out the bottom of 6-pack carton (always a ready supply near the beer fridge). Perfect jeep repair material, at least for proof of concept. Three yellow LEDs wired together form the turn signal array and two white LEDS form the parking light array. The cardboard holder fit nicely behind the lens and the small collection of wires didn’t require any drilling of the grill. With only a slight amount of guilt for being too modern and not authentic, Barry decided to go with this plan, at least for now.
While the 6-pack cardboard base added some “class”, Barry wasn’t sure it would hold up over the years. LEDs are directional and don’t require a reflector but something stiffer and more durable than cardboard was needed. In one of his many “parts” boxes Barry spotted a perforated circuit board. The perfect material. A trip to Radio Shack produced a set of 2’’ square boards. A trip to the sander to make them round, and small holes were drilled to fit the LEDs. They are ready to test and install. The positive leads from the three yellow bulbs were soldered together, as were the positive leads for the white LEDs and each was fitted with a quick connect lug. All the ground leads were soldered together and fitted with a ring connector.
Installation was simple. All the wires easily fit through the gill hole. The turn and parking leads were plugged into the appropriate wiring harness connector. The LED ground wire was attached to the screw holding the lens ring. A quick check and we now have parking lights and working turn signals front and back. Finished!
Well maybe. The white lights are very white and do show up well against the grill. However, Barry is not sure of the “look” and may trade them out for yellow. The three yellow LEDs for the turn indicator do produce a nice bright light, but we may want to add more (there is plenty of room for up to four) just to make sure the turn signal can be seen. Those are easy changes that can wait for another day.
Buckets of rust
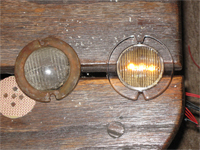
The reader might recall that Barry had purchased a set of headlight buckets that were in great shape but were the wrong model for Ole Blue. So we were stuck with repairing the originals. Headlight mounts for jeeps consist of an outer shell (we assume this is the “bucket”) and an inner metal liner that hold the bulb. This inner liner is fastened to the outer shell with screws and springs. The springs hold the liner in place, while the screws allow the headlight to be “aimed”, moving the inner liner up/down and left/right. The buckets aren’t sealed and over the years, water had leaked in and caused considerable surface rusting. The springs were broken and rust eaten. Luckily (engineering?) Willys used brass inserts for the adjustment screws, so those were not rusted and the shells came apart easily. We had ordered new springs and grommets from Walck’s. Now about that rust…
Good enough
One would think that when a project covers years, some of that time would be taken to do the perfect restoration. With some things where having the body off provides a one-time opportunity to get it right, we have done a proper restoration. With other items that we can easily return to in the future, we have taken the “good enough” approach. The headlight buckets are a good case in point. If we were doing this properly, we would have sent the parts off to be sand blasted and made them appear factory fresh. From a functional standpoint all that is needed is to take a wire brush to the rust, a spray can paint job, install the new springs and we are ready to go. We can always remove them in the future and do a proper restoration. Or perhaps we should leave some things for Maddie and Robbie.
Today’s lesson
For now the buckets received “good enough” treatment. Looking “refreshed, but not restored” the buckets needed to be reassembled. Let’s see, install the new springs, hold the inner liner just right, and insert screws. Easy. An hour later, Barry had one bucket assembled. Ten minutes later the second bucket was assembled. He guessed if he had to do a third, it would have taken less than 5 minutes.
It bears repeating here that these old jeeps were made to be serviced in the field and while they sometimes require special tools, most assemblies aren’t complicated. They are simple. Sometimes the assembly methods are so simple that they are easily missed.
Without going into great detail, but with enough so that if we do this again we can read this and remember, here is the story. As stated above, the brass nut assembly for the adjustment screws made it easy to disassemble. The brass nut assembly fits into tabs (one is visible in picture of the disassembled buckets at about the 4 o’clock position) welded on the side of the outer shell. When Barry disassembled the buckets, he bent the tabs slightly and the brass assembly slide out. When he reassembled the first unit, he squeezed the tabs so that the assemblies were snug. Mistake. The design was for the assembly to have some movement within the tabs (they could “rock”) to allow the alignment screws to enter the nut at a slight angle. Without the movement, Barry had to pull against the very strong springs so that the screw was straight up and down above the nut. In his first attempt, he cross-threaded the soft brass in his effort to get the screw started. The next 30 minutes was spent taking the bucket apart, re-threading the brass nut with a tap and swearing. After the second attempt yielded the same results, the next 15 minutes were spent staring and repeating “this is way too hard.” A little voice said “you know, if that nut was at a very slight angle, this would work…”
After this moment of enlightment, Barry quickly loosened the tabs and made another attempt. Success! That little bit of movement had been engineered into the bucket. So simple.
Bright and shiny objects
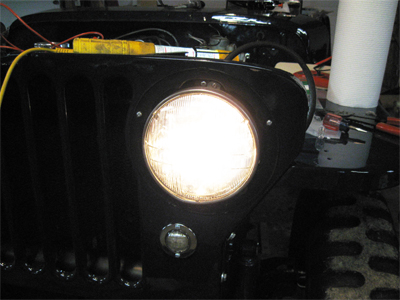
The rest of the headlight install went smoothly. Again the wiring harness made hooking up the headlights a simple process. We will wait to add the fancy chrome outer rings (which hid the innards and the adjustment screws) until we do the garage-wall-headlight- aim.
Meanwhile, before affixing the headlight wiring to the grille and routing it under the grill’s top lip, we needed to install the hood welt. The “kit” came with a length of fabric (the welt) and shiny metal rivets for attaching same to the top of the grill. This serves as a cushion for the hood. The small rivets are shaped like a clothespin and the “legs” are spread to each side, holding the welt in place. Without a doubt, there exists a special tool for installing the rivets. We used a screwdriver to spread the legs, then a pair of curved Visegrips to tighten the rivet to the body. Nothing special here. Just another of those little things to be done.
Next up – In the hood
Barry’s notes –
Evan’s notes –